rispoklife
  • Home
  • About
  • Contact
  • Creating
  • Cooking

DIY ABC Blocks- Easy Gift Tutorial!

12/7/2012

1 Comment

 
Picture
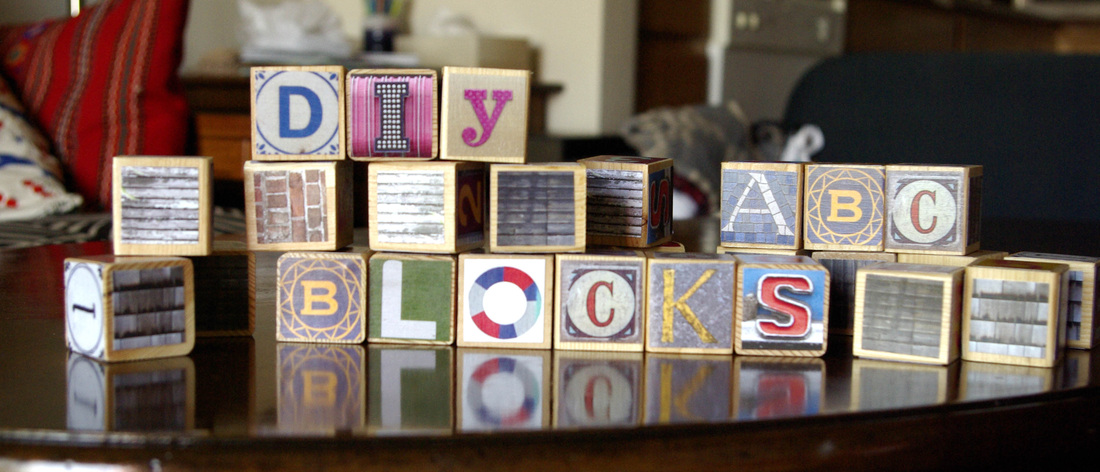
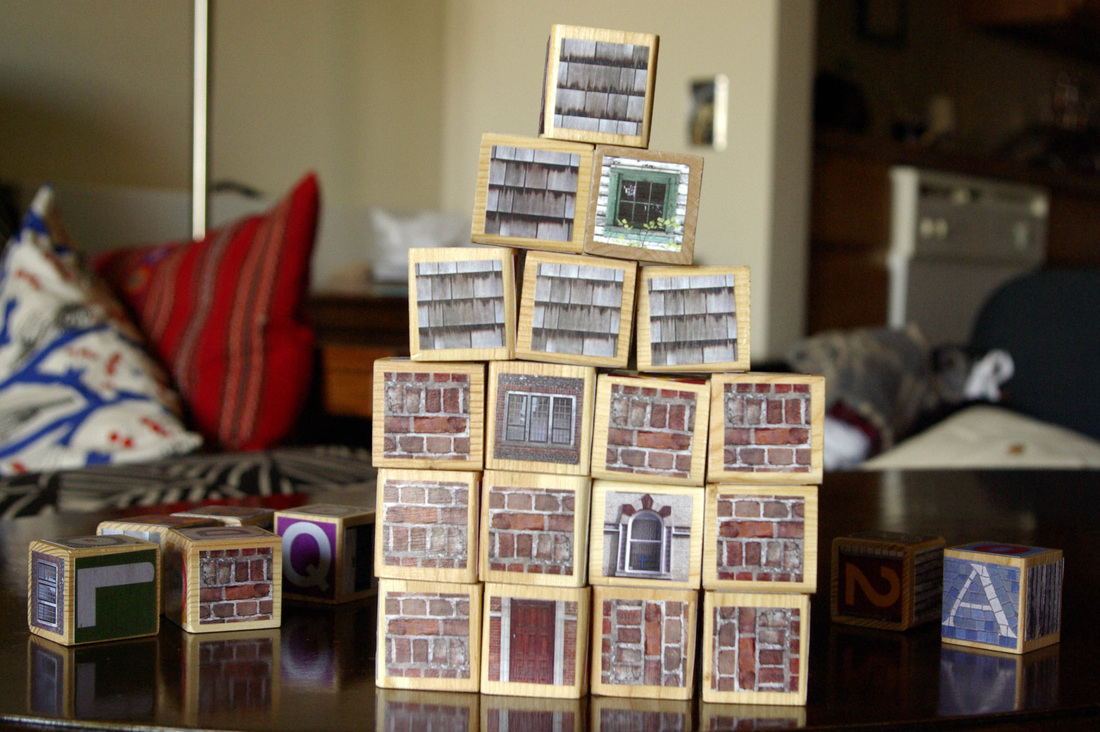
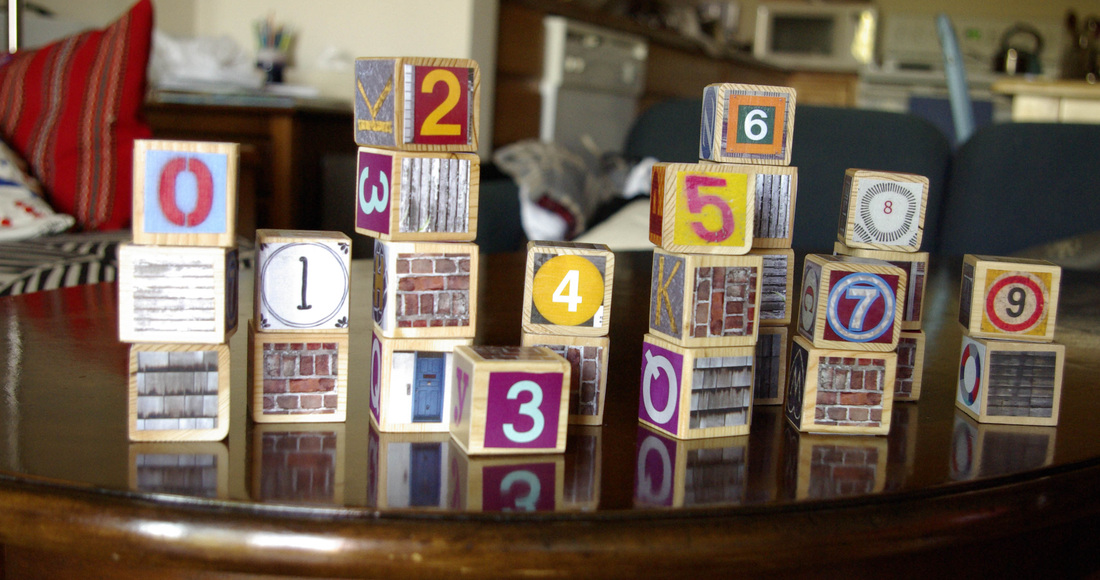
Need any last minute kid gifts? I've got a super fun one for you! Make your own set of ABC, 123, or whatever type of blocks you want!
Picture
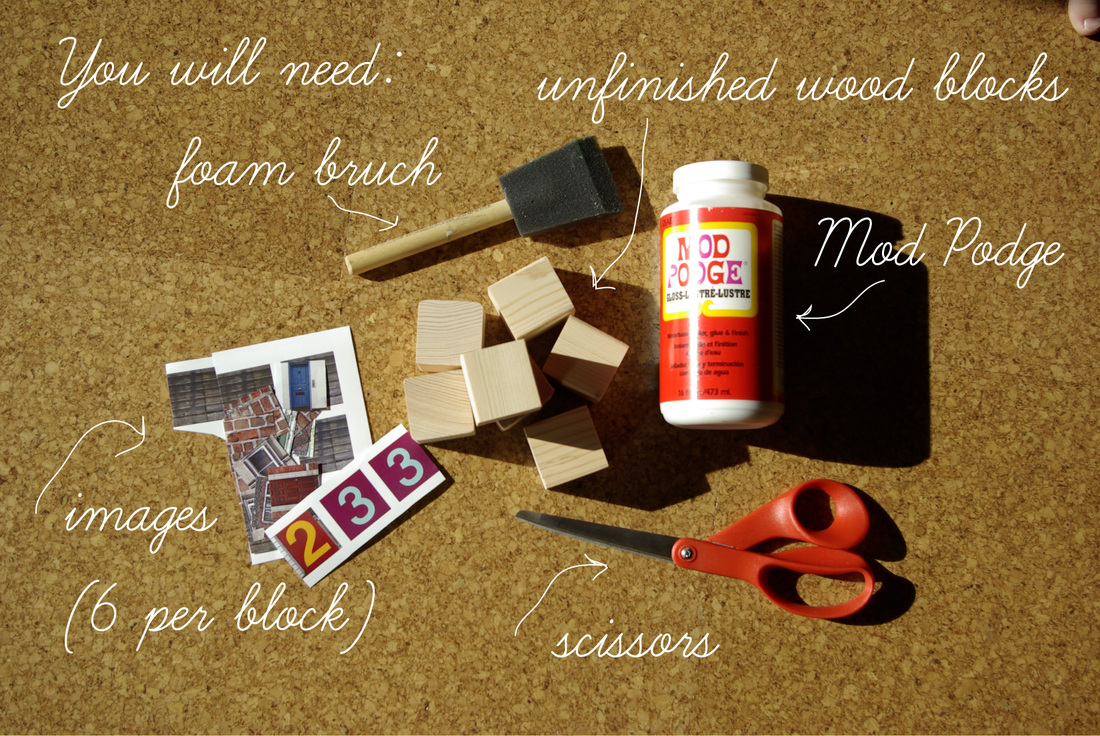
To make these blocks you will need:
    ::Unfinished wooden blocks, however many you choose- I got a set of 26 from ems woodbydesign on Etsy.

    ::6 images per block, cut to fit the size of your block face- my blocks were 1.5", so I cut my images to 1.25". I got my letter and number images from Leo Reynold's flickr page- he offers his images free for download and use under a Creative Commons' license. You could use magazine images, scrapbook paper, any kind of paper products as well.

    ::Mod Podge. I'm sure there are other mediums that would work just as well, but this is what I used.

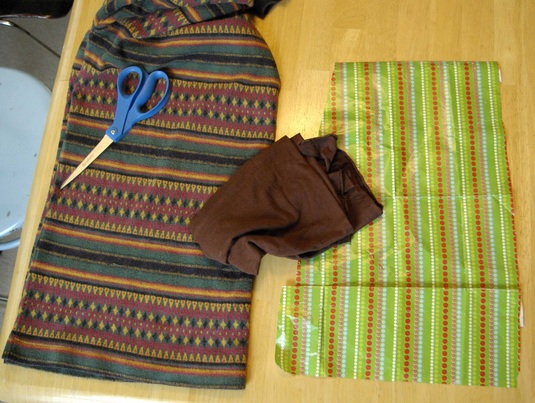
    ::Scissors. Sharper the better.

    ::A foam brush. Other brushes would probably work too, but I like the foam brush because it leaves less of a brushstroke.
Picture
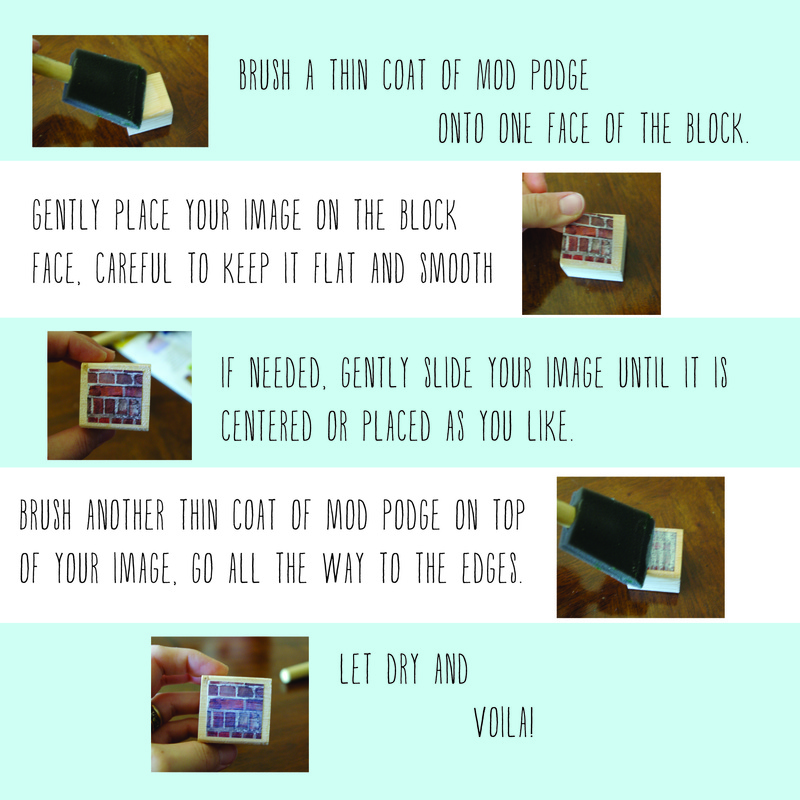
Repeat for all sides of the blocks. Give them at least 24 hours to dry and cure not touching anything else. The more dry time you can give them, the better. Enjoy!
Picture
Picture

Are you going handmade this year? What are you making?

1 Comment

The Yoga Pants of Skirts Tutorial

1/6/2012

4 Comments

 
Picture
So, I make a couple of different kinds of skirts for myself and I've had a few requests for a tutorial of some kind. Here it is! It's easy, it's changeable, it's everything to everyone! I made this from start to finish, including photography (which you can tell from my crazy white balances takes a LONG time), in under an hour. Easy.

Materials

Picture
For this skirt you will need:
A shirt of any kind of stretchy material that you would like stretched across your bum that is big enough, when folded in half, to fit your pattern piece.
The pattern piece that I will show you how to make momentarily
super stretchy jersey at least 8 inches by the size of your waist (the long dimension should be the stretchiest direction of the jersey)
sewing machine
thread
scissors

How to Make Your Pattern Piece

Picture
The piece above is obviously made from wrapping paper, but I also use freezer paper to make pattern pieces. You can use whatever kind of paper you want!
We're going to use the existing shirt hem for the hem of the skirt (yay!) so the bottom and top of your pattern piece will be parallel to each other. One side will be perpendicular to these as it will be placed on the fold of the shirt. So, as in the picture above, just one side of the pattern piece will be angled.
My pattern piece was 8 in across at the top, 11.5 in at the bottom and 16.5 in long. For the angled side I just drew a straight line from the top to the bottom measurement. I'm 5'3" and a size 4, so if you are significantly different, you'll want to adjust those measurements.

Cutting

Picture
Now take your shirt, fold it in half, and make sure the side seams are lined up and the bottom edges are aligned.
Place your pattern piece with the straight long side on the center fold of the shirt (away from the side seams).
Cut around your pattern piece (don't add seam allowance, we're working with knits here!).
You can also cut out your waistband piece. Using a quilting square or some other way to measure and cut accurately, cut out a rectangle that is 8 in wide by however wide your waist is, making sure that the waist dimension is with the stretchiest way of the jersey. Don't add any length over and above your waist measurement, you could actually take an inch or so off if you like, you don't want the skirt to fall off!
Picture
Your pieces should look like this. But maybe less wrinkly...

Sew it Together!

Picture
Take your two skirt body pieces, place them right sides together, making sure to line up those bottom hems, and sew the first side seam! I use a 3/8 in seam allowance, but you should use what you're comfortable with, it's not a big deal.
When I'm sewing over the bottom hem, I sew perpendicular to the bottom of the skirt, disregarding our angled cut. That way the hem hangs straight when your wear it, not weird.
I use a plain old straight seam. Honestly, you don't need this seam to stretch at all, so no zigzagging. I do use a medium length stitch so it doesn't pucker.
When you're done with the first seam, do the other side.
Picture
You should now have something that looks like this lovely trapezoid here. This is the time to make sure you can pull your skirt on over your hips and that it fits the way you want. Don't worry if it's not tight enough at the top, the waistband will change that.
If you want to make a change just redo the side seams until you're happy.
After you are pleased with the skirt body. Get out your waistband piece.
Fold it in half so the short sides are lined up, right sides together, and sew them together so you have a loop about the size of you!
Now take the two ends of the seam you just sewed and line them up WRONG sides together, folding the loop in half, giving you a 4 in wide loop with no exposed seam allowances.

Add the Waistband

Picture
Find the middle point of the waist one of the skirt body pieces and lay your two seam ends of your waistband piece on top of it.
Using a narrow zigzag stitch and a wider seam allowance (I used 1/2 in) sew the waistband onto the skirt body.
You'll need to stretch the waistband fabric as you sew or you'll get some gnarly puckery gathers at the end. Stretch gently, but firmly and consistently, adjusting your tension as you go to make sure you end up with the proper amount of each fabric at the end.
Some people use pins.
That's not how I roll.
You now have a skirt! You can finish your seams if you want- serger, pinking shears, whatev. I don't usually do anything with cotton jersey, it doesn't fray.
Picture

The End

Ha ha ha!
If you make this skirt, let me know what you thought! Better yet, share a picture!
Have a lovely weekend!
4 Comments

Gift Idea Roundup!

11/28/2011

2 Comments

 
I guess it's officially "Holiday Season" now that we're past Thanksgiving, so I thought I'd get into the spirit! I'm ready for my craft show this weekend and my costume commission is nearly done, giving me way more time to work on my holiday gifts.

We aim for about 75% handmade in our house, primarily made by me, so I have to spend A LOT of time finding ideas and inspiration. I've put together a small collection of tutorial links and handmade gift ideas that I love, in case you are looking for some inspiration!

For Her

Picture
1. Gorgeous fancy pants necklace tutorial at flamingotoes
2. Comfy flannel slippers tutorial from compulsive craftiness
3. DIY rope necklace from Honestly WTF
4. Trendy washer necklace DIY from the small object

For the Home

Picture
1. DIY map art from uniform natural
2. Cool crafty trivet from the small object
3. Recycled sweater blanket from shelterrific

For the Kiddos

Picture
1. Raglan sleeve shirt tutorial from craftiness is not optional
2. Adorable tiny owl tutowlrial from moonstitches
3. Lunch money cuff tutorial from a lemon squeezy home

For the Workmates

Picture
1. Crazy cute Norwegian coffee cosy tutorial at pickles (in English)
2. Cross stitch iPhone cases for those old-fashioned tech nerds at purlbee
3. Felted mittens with knitted cuffs tutorial also at purlbee

Hope you found something good! Feel free to leave a link to YOUR favorite tutorial in the comments!

2 Comments

Crochet Tutorial and Sneak Peek!

11/23/2011

2 Comments


Crochet Ornament/ Mobile Tutorial

Picture
I'm sure so many of you are sitting around this week, totally bored, wishing you had a little project to keep your hand busy....

Okay, so that's ridiculous, but I will say that these are fun to do on a car ride, and I'm thinking probably a lot of us will be taking car rides of varying lengths over the next several weeks.

I was inspired by a much more complicated and beautiful version of these on Etsy a few weeks ago and thought that it would be just the thing for my colorful scrap yarn and some 2 1/2" metal bracelets I bought MANY years ago and have yet to wear.

To make these, you will need:
1. small amounts of different colors of yarn  (I used worsted weight, but finer would be fine too)
2. some kind of metal rings (2 1/2' worked well, but bigger would probably look nice too)
3. about 15 min to make each one
4. the ability to chain, slip stitch, single crochet, and double crochet- pretty simple!

The Nitty-Gritty Details

Picture
Row 1- chain 6, connect with slip stitch so you have a loop.

Row 2- chain 3(counts as one double crochet), double crochet into loop, chain 2,( 2 double crochet into loop, chain 2)repeat this 4 more times so you have a total of 6 groups of 2 double crochet, join to first chain 3 with slip stitch, break off yarn 1.

Row 3-Join yarn 2 with slip stitch in any chain 2 from row 2, chain 3(counts as one double crochet), 2 more double crochet into same chain 2 space, chain 2, (3 double crochet into next chain 2 space, chain 2) repeat 4 more times, join with slip stitch, break off yarn 2

Row 4 (or, if you're using different size metal ring and/or yarn, whenever your circle is approx the same size as your ring)- holding crochet and ring together, join yarn 3 with slip stitch in any chain 2 space AROUND metal ring as well, chain 1, 3 single crochet in same chain 2 space around metal ring as well, single crochet in each double crochet and 3 single crochet in each chain 2 space all the way around, making each stitch around the metal ring too, join chain 1 with slip stitch and bind off, leaving long tail to work with later.

Repeat for as many as you feel like making. Join them to a branch or colander or whatever to make a mobile, or tie them to each other to make a beautiful garland, or tie hooks onto the tails to make ornaments!

New Product Sneak Peek!

Picture
I will be debuting a new product at the Poor Artist's Sale Dec 3 in Calumet- coasters! Some are screen printed, some are designer fabrics (you may notice some Marimekko in the background there). They will be selling for $20 for a set of 4 and any that survive the show in Calumet will be posted on my Etsy shop with plenty of time to ship for the holidays!
Picture
I'll be taking the rest of the week off to celebrate all the many many things I have to be grateful for and to celebrate my husband's birthday! In the meantime, here is a list of a few of the things I'm giving thanks for right now. What are you grateful for today?
5's teething fever has broken
snow
the really nice folks at our local post office
hand-me-downs
sweet potato pecan pie (cooling on the counter!)
all of you! who read my stories and share yours with me and help me remember that I'm not alone!
Thank You!
2 Comments

Easy Peasy Upcycled Fancy Pants Tutorial!

7/1/2011

3 Comments

 
I've been meaning to do a pants tutorial for weeks, and now that 5 is crawling (!) he is DEFINITELY going to need some new pants. I figure he'll probably retain the same mass, more or less, but it will probably be rearranging itself soon into some longer, slightly less marshmallow-y shapes. So! Pants!

To make these pants, you will need:
a long sleeve shirt (or two long sleeves of the exact same size)
scissors
sewing machine
elastic 3/4" or 1", as long as your babe is around
pins, if you like, I don't use them usually
a big safety pin
a pair of pants that fit properly around the waist and diaper (to use as a guide)

Get Your Pieces Ready

Picture
Cut off the sleeves of your long-sleeved shirt right where they attach to the shoulders. When you're done, they should look like the picture on the right.
Picture
Lay your guide pants on top of one sleeve, with the sleeve seams on the same side as the guide pants crotch. It doesn't matter if the bottom part of the sleeve is bigger than your guide pants, we're just using them to get the crotch area right.

Make sure there is about two inches of fabric to spare above the waist of the guide pants- you'll need it to make the casing for the elastic.

Once you're all lined up, cut the sleeve along the seam that goes from the crotch to the waist of the guide pants and continue up in a straight line once you reach the waist.

Leaving the guide pants where they are, cut the sleeve approx two inches above the waist of the guide pants. Better to have more room for the diaper than less...
Picture
When the first sleeve is ready to go, lay it on top of the second sleeve, both sleeves inside out, seams on the same side (I have them here on the right). MAKE SURE that the cuffs at the bottom are perfectly lined up and that the seams are really matched up- you don't want one leg longer than the other!

Make the same two cuts to the second sleeve as you did to the first, using the first as your guide.
Picture
You should now have two pieces that look like this.

Give Those Pants Some Legs to Stand on!

Picture
Now, turn one of your sleeves right side out.

Stuff it inside the other sleeve, lining up the cuffs and the existing seam.

Take this little sleeve bundle to your sewing machine and sew along the U-shaped line that will make the crotch of your new pants. I like to start at the center and sew to the waist, so I can make sure the two existing seams line up perfectly.
Picture
Pull the sleeves apart and you should have something that is starting to look like pants!

Haste Makes Waist (wait, what?)

Picture
Now, to give those pants a waistband! With the pants still inside out, fold over the top by about 1 1/2". We're going to fold the cut edge under again, just a bit, but I usually do that as I sew. Starting in the back (just because), sew close to the folded under edge with a zigzag stitch, leaving 2-3" unsewn so we can get the elastic in there.
Picture
I cut the elastic to the size of the waist of my guide pants plus an inch or so.

Fasten your big safety pin to one end of the elastic and insert it into the casement.

Keeping the elastic from twisting, scooch (yes, that's a technical term) the pin through the waistband, pulling a bit of the elastic in each time. Don't pull the elastic all the way in though, we still need to sew the elastic to itself.

When you have finished, your pants should look like the picture on the right, with elastic coming out each side of your gap in the waistband casement. Remove the safety pin.
Picture
Sew the elastic to itself like so, with a big seam allowance. MAKE SURE IT'S NOT TWISTED BEFORE YOU SEW IT.

Then spread the seam allowance and sew it down too.

Unbunch the waistband until all the elastic is in the pants and the fabric is uniformly gathered or ungathered.

Is That the End?

Picture
Almost! Carefully fold under the raw edge in your waistband gap and zigzag it, making sure not to sew on the elastic. Overlap stitches with the beginning and end of your previous go at the waistband.

Congratulations, You Captain of Pants-Making, You!

Picture
Lo, and behold, the finished product! Let's stick a cute baby in there, shall we?
Picture
As you can see, they are a little bit long and a little bit snug, in preparation for his slimmer crawling (and ohmygod soon walking) self.

Go Forth and Make Pants!

3 Comments

    Author

    My name is Ansley Knoch. I am the creator of Rispok, a line of accessories for big and little people made from repurposed materials. I live in Madison, Wisconsin with my husband, Fred, and our son, also Fred, better known as 5.

    Archives

    June 2013
    May 2013
    April 2013
    March 2013
    February 2013
    January 2013
    December 2012
    November 2012
    October 2012
    September 2012
    August 2012
    July 2012
    May 2012
    April 2012
    March 2012
    February 2012
    January 2012
    December 2011
    November 2011
    October 2011
    September 2011
    August 2011
    July 2011
    June 2011
    May 2011
    April 2011
    March 2011

    Categories

    All
    52
    Artists
    Breakfast
    Cooking
    Design
    Fall
    Family
    Fashion
    Finnish
    Holiday
    Holidays
    Juggling
    Kcwc
    Music
    Parenting
    Pregnancy
    Printing
    Product
    Projects
    Protest
    Recipes
    Remnants
    Repurposing
    Reuse
    Scandinavian
    Sewing
    Spring
    Studio
    Summer
    Travel
    Tutorials
    Up
    Winter
    Wisconsin

    RSS Feed

    Picture
    Follow Me on Pinterest
    Picture
    my craftgawker gallery
Powered by Create your own unique website with customizable templates.